Source review: . Reviewer and owner: SkyLumi editorial owner. Next review: . Recheck sooner if a linked source or tool changes. To report errors, email hello@skylumi.app.
The shortlist at a glance
For a first shortlist, look at the Seestar S50 Pro for a compact, aperture-first setup and the S30 Pro for a wide native frame. The DWARF 3 is the lightest and cheapest kit. DRACO is the ambitious launch to watch rather than a proven winner. Vespera 3 and Vespera Pro 2 sell automated multi-night projects, and Origin Mark II brings far more aperture along with a far bigger transport job. These are use-case picks from manufacturer specifications and documented workflows. SkyLumi has not run a group test of these instruments, and this guide says so wherever a claim rests on a spec sheet.
| Telescope | Listed price | Optics | Native image | Mass | Why look at it |
|---|---|---|---|---|---|
| Seestar S50 Pro | US $899 launch price, then $999 | 50 mm / 260 mm | 8.3 MP, 16:9 | 2.8 kg body | Aperture and reach in a compact body |
| Seestar S30 Pro | US $699 | 30 mm / 160 mm | 8.3 MP, 16:9 | 1.65 kg body | The widest native frame of the group |
| DWARF 3 | US $549 | 35 mm / 150 mm | 8.3 MP, 16:9 | 1.35 kg body | Lightest and cheapest, with on-device restacking |
| DWARFLAB DRACO Standard | US $1,299 launch price, then $1,399. Preorder | 90 mm / 340 mm | About 12 MP, 2 × 2 binned, 4:3 | 5.5 kg body | The largest aperture short of Origin, with built-in guiding |
| Vaonis Vespera 3 | €2,490, out of stock when checked | 50 mm / 245 mm | 8.3 MP, 16:9 | 5 kg body | Automated multi-night mosaics |
| Vaonis Vespera Pro 2 | €2,990 | 50 mm / 245 mm | 12.5 MP, square | 5 kg body | Finer sampling in a square frame |
| Celestron Origin Mark II | US $4,299 | 152 mm / 335 mm RASA | 8.3 MP, about 16:9 | 18.87 kg complete system | Large aperture for a fixed site |
Prices and technical figures are as listed by ZWO, Seestar, DWARFLAB, Vaonis and Celestron on 9 September 2026. A listing is not a promise of stock, delivery time or a particular bundle. US dollars and euros stay separate, because converting a euro storefront price would not tell you the tax, freight or warranty terms of a US order.
Two offers were about to end when we checked. ZWO advertises the S50 Pro launch price until 00:00 Pacific time on 15 September 2026, and DWARFLAB advertises DRACO’s until 14 September. DRACO is a preorder, and DWARFLAB estimates that September orders ship within two months, so do not plan a fixed-date trip around it. The DWARF 3 checkout page carried inconsistent stock wording on the check date, so this guide does not call it in stock either.
The even smaller DWARF mini deserves a mention when weight decides everything. DWARFLAB’s product page lists an 840 g body and a 2 MP main camera, and its checkout page showed US $419 rather than the $399 that older coverage still repeats. Treat it as a separate budget-and-weight choice rather than a miniature DRACO.
What a smart telescope does, and what it leaves to a visual telescope
Most buyers in this category are choosing a screen-based imaging experience. The device points itself, tracks the sky and assembles a photograph that improves as usable exposures accumulate. That is a different hobby from putting your eye to a conventional telescope, so decide which of the two you are buying before you compare any specifications.
A compact deep-sky imager is a good route into photographing nebulae and galaxies. It is a poor substitute for a larger visual telescope pointed at Saturn, where magnification and steady air matter more than long exposures. The reverse holds too. A fine visual telescope does not become an easy deep-sky camera because a phone can be clamped to its eyepiece, since tracking, image scale and exposure length are different problems.
The models here are a deliberate imaging shortlist. We have not evaluated every smart telescope, digital eyepiece or conventional telescope on sale. Here “best” means the best fit between an intended use and the evidence we could find.
Start with the objects you want to photograph
Write down five targets before you choose a telescope. A list dominated by large nebulae and the Andromeda Galaxy points to a different native field than a list of compact galaxies. A target that needs a mosaic also needs a plan for how exposure time is shared across its panels.
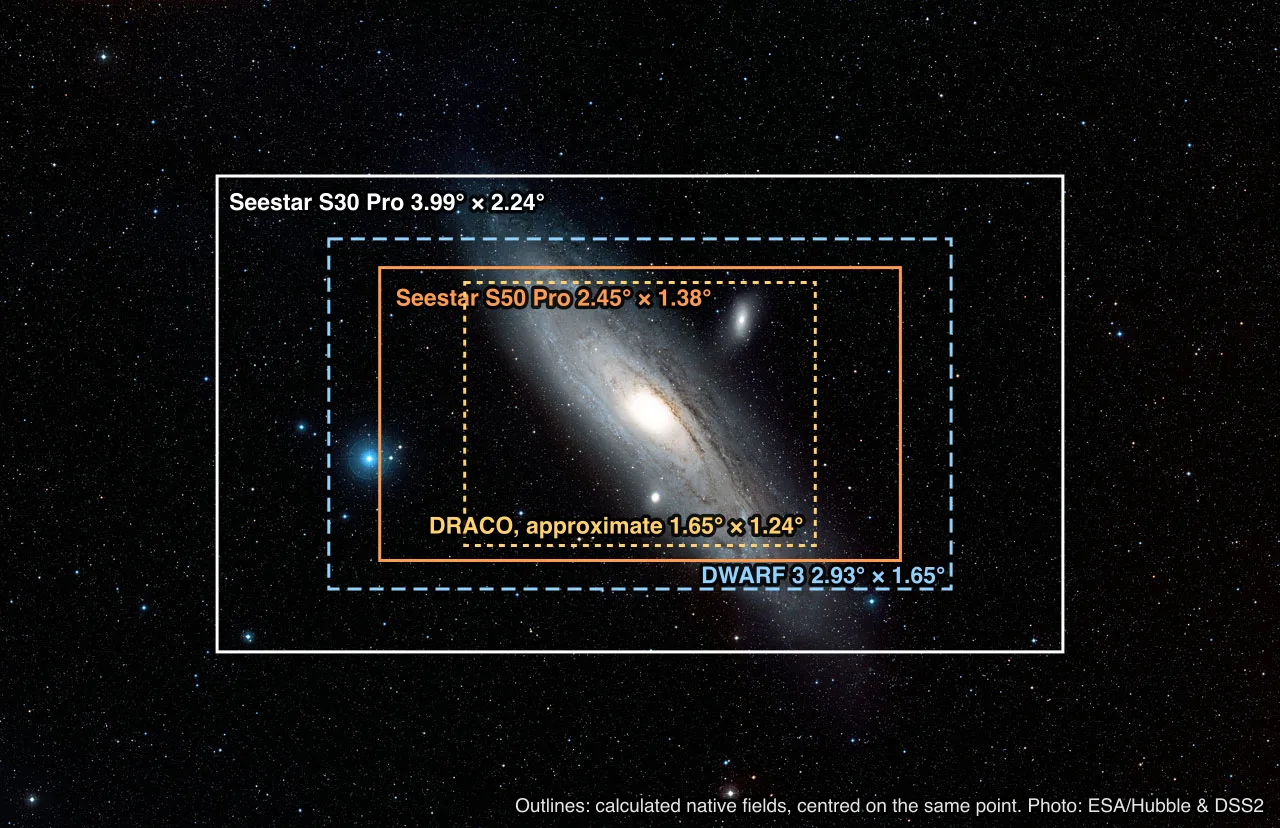
The calculated fields below put every camera on the same basis, long side by short side, before mosaics and before a stack is cropped. That avoids comparing one manufacturer’s diagonal field with another manufacturer’s horizontal one, which is how spec-sheet comparisons quietly go wrong.
| Telescope | Calculated native field | Calculated image scale |
|---|---|---|
| Seestar S30 Pro | 3.99° × 2.24° | 3.74 arcseconds per pixel |
| DWARF 3 | 2.93° × 1.65° | 2.75 arcseconds per pixel |
| Vaonis Vespera 3 | 2.60° × 1.46° | 2.44 arcseconds per pixel |
| Seestar S50 Pro | 2.45° × 1.38° | 2.30 arcseconds per pixel |
| DWARFLAB DRACO, deep-sky mode | about 1.65° × 1.24° | about 1.45 arcseconds per pixel |
| Vaonis Vespera Pro 2 | 1.65° × 1.65° | 1.68 arcseconds per pixel |
| Celestron Origin Mark II | 1.32° × 0.75° | 1.23 arcseconds per pixel |
These are geometry rather than measured star sizes. The formulas and every input are in the calculation dataset, which you can download and check. DRACO’s rectangle is inferred from DWARFLAB’s published megapixel count, aspect ratio and pixel pitch, since nobody has read it from a production RAW file. That is why it carries “about” wherever it appears.
A smaller arcseconds-per-pixel value puts more samples across the same object. It does not prove that the optics, the atmosphere or the tracking can supply proportionally more detail. A soft star spread across six pixels holds no more information than the same star sampled across three, so read the scale as potential rather than as a result.
Seestar S50 Pro: aperture in a compact package
The S50 Pro is a sensible starting point when you want one compact instrument for a mix of galaxies, clusters and nebulae and can live without the widest native frame. Against the S30 Pro the difference is aperture and sampling rather than pixel count, because both produce an 8.3 MP main image. They do not share a sensor either. ZWO lists an OmniVision OS08B10 in the S50 Pro and Seestar lists a Sony IMX585 in the S30 Pro. The S30 Pro’s 2.9 µm pitch comes from ZWO’s IMX585 camera listing, because Seestar’s page omits it.
The trade is straightforward. A tighter field makes a small object occupy more of the frame, and it makes a large object more likely to need several panels. A bigger aperture creates more potential, and that potential is only worth paying for when setup time, local conditions and processing skill do not become the limit first.
It is a particularly good choice for someone who wants room to improve at processing. Before you upgrade again, keep the individual exposures from a successful session and test whether a different stack or stretch gives you the improvement you wanted. An instrument change and an editing change solve different problems.
The original S50 needs separate treatment. Its 1920 × 1080 frame should never stand in for the Pro in an image comparison. The Pro’s fourfold pixel count mostly buys a larger recorded field, and nothing like four times the detail on a small galaxy. The three-way comparison works through those numbers.
Seestar S30 Pro: when the frame matters more than reach
The S30 Pro is the natural fit when a large native field is a requirement rather than a pleasant extra. A photograph that fits in one frame does not divide a short clear spell among mosaic panels. For a big nebula that can matter more than any theoretical gain on targets you never shoot.
Its calculated native sky area is about 2.64 times the S50 Pro’s. That compares coverage rather than sensitivity, and a wide field can even make an object feel less impressive on a phone because it occupies fewer display pixels. Decide whether you want the object isolated or shown in its surroundings.
If you are considering the S30 Pro mainly to save money, price the whole setup. A power bank, a stable support and any tilt arrangement narrow the gap. If you are choosing it for the wide frame, you have the more durable reason, because that advantage survives every price change.
DWARF 3: the travel kit
DWARF 3 sits between the two Seestars in calculated field and sampling while weighing less than either. That combination makes it the candidate when the telescope has to share a bag with other equipment. Its lower price also leaves more budget for a steady support or for travel to darker skies.
Do not reduce the software comparison to “simple versus advanced”. The useful question is which editing operation matters to you. DWARFLAB’s DWARF 3 manual documents a local Mega Stack that restacks on the telescope from selected frames, and a separate Stellar Studio workflow that uploads a stack for cloud enhancement. A traveller should separate capturing and restacking without internet from uploading a finished stack for polishing.
The cheaper instrument is often the better purchase because it gets used more. That is not a claim that portability cancels an optical disadvantage. A larger telescope left at home contributes no exposures to the project, and that is the whole argument.
DRACO: a big launch that still needs field evidence
DRACO changes the aperture bracket of this shortlist. Its advertised built-in guiding and 300-second exposures make it worth examining for smaller deep-sky targets. The Standard and SHO editions are also two different purchases. The SHO edition adds a second emission-line filter combination that records sulfur, and a colour preset cannot create that data after the fact.
The spec sheet is attractive. The open question is whether production units consistently turn it into sharp, well-calibrated data across the whole frame. Answering that takes raw exposures, acceptance rates, repeated sessions and a workflow that someone outside the manufacturer can demonstrate.
We did not find an independent DRACO field test by the check date. That describes the evidence used here and says nothing about whether testers already have units. A missing test should not become a reliability score in either direction.
In particular, do not read regulated, below-ambient camera cooling into DWARFLAB’s “CMOS cooling” and heat-management language, and do not treat its promised field derotation as a measured tracking result. The DRACO versus S50 Pro comparison separates those claims from the geometry that can already be calculated.
Vespera 3 and Vespera Pro 2: pay for the workflow you will use
The current Vaonis pair is the Vespera 3 and the Vespera Pro 2, and a fair comparison uses them rather than the previous generation. Vaonis emphasises automated multi-night mosaics, resuming a project after clouds and exporting a prestacked file. Those features matter to someone who wants to build a large project without organising every night’s panels by hand.
The numbers are revealing. Both models have the same 50 mm aperture and 245 mm focal length, and they differ only in sensor geometry. The Pro 2 samples more finely and records a square field, while the Vespera 3 covers more sky along its long side. A bigger megapixel figure therefore does not tell you which one fits a given composition.
Before paying for the automation, define the job it must complete. Does it need to resume after clouds, keep the same framing across nights, save a stack you can process elsewhere, or recover a half-finished mosaic? Ask for the documented behaviour of each rather than whether “multi-night” appears in the feature list.
The Vaonis storefront we reached quoted euros, and those amounts are not converted into supposed US prices here. A currency conversion would say nothing about regional tax, included accessories, freight or warranty.
Origin Mark II: more aperture, a different transport problem
Origin Mark II is the large-aperture alternative in this group. Its RASA optics carry a central obstruction, so the clear area is not simply the square of 152 mm. Using Celestron’s stated 77 mm obstruction, the unobstructed geometric area equals a circle about 131 mm across, before transmission, sensor efficiency and diffraction enter the picture.
The same figures give about 6.87 times the clear area of an unobstructed 50 mm aperture. That is useful context rather than a forecast of a 6.87-fold better image. Multiplying it by a separate focal-ratio advantage and calling the product an exposure-time saving counts the same change twice.
For ownership the deciding number is system mass. The table’s Origin figure includes its mount and tripod, whereas the smaller instruments are listed as bare bodies. Even with that difference made explicit, Origin is a setup to transport in pieces and assemble rather than another small bag item.
Celestron’s filter drawer takes standard 1.25 and 2 inch filters, a different expansion path from a sealed set of internal filters. That will appeal to someone who already owns imaging filters, as long as they check compatibility rather than assuming it from the thread size.
Read sensor size in millimetres
Sensor format labels such as “1/1.2 inch” are not measurements of the active image rectangle. For these comparisons the active width is pixel count multiplied by pixel pitch, which makes every dimension explicit and reproducible.
A physically larger sensor records a wider field at a given focal length, and smaller pixels put more samples across a given detail. Neither proves higher efficiency or lower noise. Comparing sensor area and pixel sampling together is far more useful than declaring that one camera has the “bigger sensor” and stopping there.
DRACO’s approximate 4:3 rectangle is a little taller and a little narrower than the Seestar Pro rectangle, which its nominal format label alone would never tell you. The reconstruction is deliberately drawn dashed, because it is inferred and not measured.
What a 300-second exposure setting buys you
Longer individual exposures reduce the number of times the sensor is read out, and each readout adds a little noise. They also saturate bright stars sooner and put more of the night at risk when a single frame is spoiled by wind, cloud or a satellite. The right sub-exposure depends on the signal, the sky background, the read noise and the conditions, so the longest selectable value is rarely the best one.
For a first buyer the numbers to ask for are accepted integration and elapsed session time rather than the longest shutter time in the menu. A telescope that advertises five-minute exposures still has to focus, point, settle, calibrate and reject bad data, and all of that belongs in a real comparison.
A good test reports both an equal-time result and an equal-accepted-data result. The first captures the ownership experience, and the second isolates what happens once a similar quantity of usable data exists. Neither is interchangeable with a maximum-exposure specification.
The software test to run before the return window closes
Try one complete project instead of browsing a menu. Save a session, find an imperfect exposure, check whether you can exclude it, produce another stack and export the result. Then open that export in the desktop software you intend to use and confirm what survived before you delete anything from the device.
Write down the operation that is missing. “I cannot alter the stretch enough” is a different complaint from “I cannot reject frames by star shape”, and different again from “I cannot combine my mosaic across nights”. A more powerful telescope can leave exactly the same workflow frustration in place.
Desktop software is a separate route. Siril documents stacking and rejection tools, but an exported file still has to be interpreted correctly. A single exposure straight from the camera, a calibrated exposure and a finished master are three different inputs. A calibration recipe applied blindly to a file that was already corrected makes it worse.
Cloud processing is not disqualifying. It is a dependency that belongs in the purchase decision. Keep a local copy of data you care about and know what you can still do without a vendor account or an internet connection.
What real image comparisons can establish
Trevor Jones at AstroBackyard publishes a real S50 Pro session on M31 and a separate S30 Pro versus S50 Pro Andromeda illustration. Wido at AstroForum publishes an original S50 versus DWARF 3 comparison. Both are worth your time, and neither is a single matched four-telescope experiment, so the model generations and acquisition conditions matter when you read them.
Those photographs stay on their photographers’ pages, linked from the detailed comparisons, because we have not asked for permission to reproduce them. The Andromeda reference below is different. Its licence allows attributed reuse, and it gives every outline the same sky to sit on.
Do not judge faint outer detail from unmatched screenshots. Integration time, filter, sky brightness, altitude, resampling and processing each change the appearance, and a sharper-looking crop may simply carry stronger deconvolution or a harder stretch. The evidence becomes strong only when the original files and the processing recipe are available.
Three questions that decide it
What must fit? Use the native-field table first. Choose a mosaic on purpose rather than discovering that the object was clipped.
What will you carry and power? Compare the complete kit, including the support and any tilt arrangement. Advertised runtime comes from a vendor’s own test rather than a shared laboratory result.
What do you want to control after capture? Decide whether you want a finished image, control over individual exposures, or a reproducible desktop workflow. That choice can matter as much as aperture.
Before you buy, open your intended targets in the SkyLumi sky map and check their size against the field table. SkyLumi is an observing companion in this guide and controls none of these telescopes. Choose the instrument around a real observing plan rather than the other way round.
Questions buyers ask
Is a smart telescope good for a complete beginner?
It removes most of the mechanical setup, and the buyer still needs realistic expectations about framing, time, weather and processing. Start with one documented, achievable target and a complete export workflow rather than assuming automation removes every learning step.
Do more megapixels mean better astrophotography?
Not on their own. Pixel count has to be read together with pixel pitch, focal length, aperture and usable signal. The field and sampling table above shows how a lower-megapixel instrument can still sample a target more finely than a wider-field camera.
Which smart telescope is best for galaxies?
For small galaxies, finer usable sampling and enough aperture help most, which is why DRACO and Origin deserve a look at very different budgets and weights. A spec sheet is still not an image-quality result. For a large galaxy such as Andromeda, framing and mosaics decide the choice instead.
Should I wait for DRACO reviews?
Waiting is reasonable when DRACO’s unverified performance is the main reason to spend more or to return another instrument. Look for complete sessions, raw files and failure rates. A polished launch video answers none of those questions.
Method and limits
This is a source-based buying guide with original geometry calculations and conditional recommendations. SkyLumi has not field-tested this group, and the guide uses no invented review stars, service scores, noise measurements or guaranteed rankings.
Field of view is 2 × atan(sensor dimension / (2 × focal length)). Image scale is 206.265 × pixel size in µm / focal length in mm, in arcseconds per pixel. The values exclude distortion, optical tolerances and stacking crop, so they describe framing and sampling rather than final resolving power. The inputs, formulas and results are in the dataset as CSV and JSON.
Prices, launch terms, app features and availability need a fresh check before you buy. We will revise the guide when production DRACO data, changed firmware behaviour or replacement models alter the decision, and the source-review line at the top records when that last happened.
Sources and image credits
- ZWO: Seestar S50 Pro product page and specifications
- Seestar: S30 Pro product page and specifications
- ZWO: ASI585MC camera page (Sony IMX585 sensor data)
- DWARFLAB: DWARF 3 checkout page
- DWARFLAB: DWARF mini product page (regional)
- DWARFLAB: DRACO preorder listing
- DWARFLAB: DRACO technical overview
- DWARFLAB: DRACO regional product page
- DWARFLAB: DRACO specification table (Italian regional page)
- Vaonis: Vespera 3 and Vespera Pro 2 compared
- Vaonis: Vespera 3 product page
- Vaonis: Vespera Pro 2 product page
- Celestron: Origin Mark II Intelligent Home Observatory
- Celestron: Origin 678C camera
- Celestron: Origin filter drawer kit
- Seestar: S50 vs S50 Pro
- DWARFLAB: DWARF 3 user manual, app interface, Stellar Studio and Mega Stack
- Siril documentation: stacking
- AstroBackyard, Trevor Jones: Seestar S50 Pro review
- AstroForum, Wido: DWARF 3 vs Seestar S50 review
- DWARFLAB: DWARF mini checkout page
- ESA/Hubble: wide-field view of the Andromeda Galaxy (heic1112f)
- ESA/Hubble: usage of images, videos and web texts